A rich text element can be used with static or dynamic content. For static content, just drop it into any page and begin editing. For dynamic content, add a rich text field to any collection and then connect a rich text element to that field in the settings panel. Voila!
Headings, paragraphs, blockquotes, figures, images, and figure captions can all be styled after a class is added to the rich text element using the "When inside of" nested selector system.
Among the various techniques and practices used in first aid, splinting stands as a vital skill that makes a significant difference in ensuring the well-being and recovery of a person with a bone fracture or joint injury. In this article, we will explore the fundamental principles of splinting first aid, discuss different types of splints and their applications, outline the step-by-step procedure for splinting common injuries, and provide important tips and considerations for optimal splinting.
What are Splints?
In first aid, various splints, including rigid splints and soft splints, are used to immobilize and support injured body parts effectively. Each type of splints provide stability and support to different parts of the body. The choice of splint depends on the specific injury and the resources available. Here are some common types of splints:
Rigid Splints
Soft Splints
Anatomic Splints
Vacuum Splints
Traction Splints
Finger Splints
Rigid Splints
Rigid splints are medical devices used to immobilize and support injured body parts, typically bones or joints, to prevent further damage and promote healing. Rigid splints come in various shapes and sizes, depending on the specific body part they are intended to immobilize. They are made from materials like plastic, metal, or fiberglass, and they are typically padded for patient comfort. The choice of splint type and application technique depends on the nature and location of the injury.
Rigid splints are designed to be stiff and unyielding, providing stability and preventing movement in the affected area. Rigid splints are commonly used in emergency medicine and orthopedics for various purposes, including:
Fracture immobilization: Rigid splints are often used to stabilize broken bones (fractures) by preventing any movement at the fracture site. This helps reduce pain and the risk of further injury.
Joint immobilization: In cases of joint injuries or dislocations, rigid splint is applied to keep the joint in a fixed position, preventing any movement that exacerbate the injury.
Support for sprains and strains: Rigid splints is used to provide support and immobilization for strained or sprained ligaments or tendons, allowing them to heal properly.
Post-surgical support: After certain surgical procedures, such as joint surgeries, doctors uses rigid splints to provide support and limit movement during the initial stages of recovery.
Spinal immobilization: In cases of suspected spinal cord injuries, rigid splints, such as cervical collars or backboards, are used to keep the spine in a neutral and stable position to prevent further damage to the spinal cord.
Soft Splints
Soft splints, also known as soft braces or orthotics, are medical devices designed to provide support, stability, and compression to various parts of the body, typically muscles, tendons, or joints, while allowing for some degree of flexibility and movement. Unlike rigid splints, which are stiff and immobilize the injured area completely, soft splints are made from flexible materials such as fabric, neoprene, elastic, or foam. They are used for a variety of purposes, including:
Muscle and joint support: Soft splints are worn to support and stabilize muscles and joints affected by conditions like sprains, strains, or overuse injuries. They provide compression and help reduce pain and inflammation.
Arthritis management: Individuals with arthritis often use soft splints to support and stabilize their joints, especially in the hands, wrists, knees, and ankles. These splints improves joint function and reduce discomfort.
Tendonitis or tendinosis: Soft splints are commonly used to alleviate the symptoms of conditions involving inflamed or irritated tendons, such as Achilles tendonitis or tennis elbow. They provide gentle compression and support to these areas.
Carpal tunnel syndrome: Soft wrist splints are often prescribed to people with carpal tunnel syndrome. These splints help keep the wrist in a neutral position to alleviate pressure on the median nerve, reducing pain and numbness.
Post-surgery recovery: After certain surgeries, soft splints or braces is used to support the healing process while allowing controlled movement. For example, after knee surgery, a soft knee brace is recommended.
Preventive use: Some athletes and individuals engage in activities that put repetitive stress on their joints and muscles. Soft splints are used as preventive measures to reduce the risk of injury or to provide additional support during physical activities.
Soft splints are typically adjustable and come in various styles to fit different body parts. They are often secured with Velcro straps or closures, making them easy to put on and take off. While soft splints offer more flexibility than rigid splints, they still provide essential support and protection to injured or vulnerable areas, allowing individuals to maintain some level of mobility during their recovery or while managing chronic conditions. However, it's important to use soft splints under the guidance of a healthcare professional to ensure proper fit and usage for a specific medical condition.
Anatomic Splints
Anatomic splints, also known as anatomical splints or anatomically shaped splints, are medical devices designed to provide support and immobilization to specific body parts or joints in a way that conforms to the natural contours and anatomy of the human body. These splints are customized or designed to fit a particular anatomical region, ensuring a secure and comfortable fit for the patient. They are commonly used in orthopedics and rehabilitation to address a wide range of musculoskeletal conditions and injuries.
Anatomic splints are typically made from materials like foam, padded fabric, or plastic and are often adjustable to accommodate variations in body size. The goal of these splints is to provide effective support and immobilization while minimizing discomfort or pressure points. Proper fitting and positioning of anatomic splints are crucial to ensure they provide the intended therapeutic benefits and do not cause additional complications.
Patients should use anatomic splints under the guidance of a healthcare professional who assess their condition, prescribe the appropriate splint, and ensure that it is fitted and used correctly to promote healing and rehabilitation.
Vacuum Splints
Vacuum splints, also known as vacuum mattress splints or vacuum immobilization devices, are medical devices used to immobilize and support injured body parts, particularly in cases of fractures, dislocations, or traumatic injuries. These splints are designed to conform to the shape of the injured body part, providing a secure and customized fit while minimizing movement and discomfort. Vacuum splints are commonly used in emergency medicine and pre-hospital care.
Vacuum splints are commonly used for immobilizing limbs, including the arms and legs, but can also be adapted for use in spinal immobilization by creating a custom-fitted mattress for the patient's body. They are particularly valuable in situations where precise immobilization is essential, such as in the case of suspected fractures or dislocations.
Traction Splints
Traction splints are medical devices used to immobilize and provide traction to an injured limb, typically the lower extremities, such as the femur (thigh bone), when a fracture or dislocation is suspected. These splints are commonly used in emergency medicine and pre-hospital care to stabilize fractures and reduce pain and further damage. Traction splints are particularly important in cases of femur fractures, as they help prevent complications such as internal bleeding and nerve damage.
Traction splints are primarily used for femur fractures, which is life-threatening due to the potential for significant blood loss and damage to nearby blood vessels and nerves. The application of traction helps align the fractured bone ends, relieve pain, and improve overall patient comfort during transport to a medical facility.
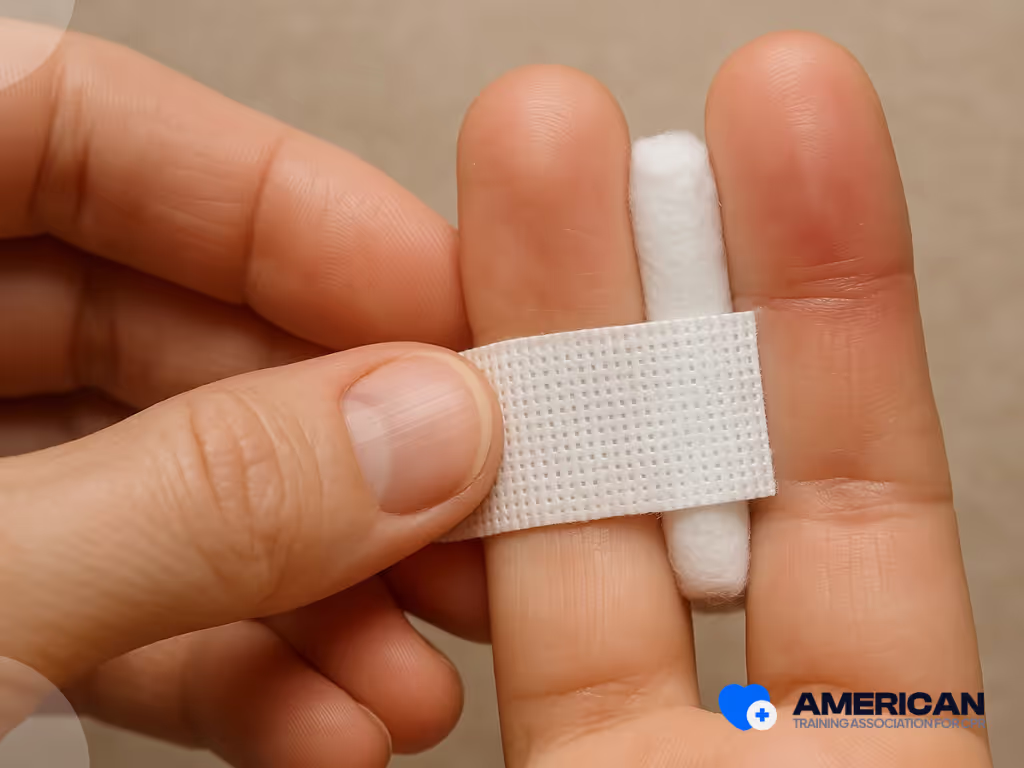
Finger Splints
Finger splints are medical devices used to immobilize and support injured fingers or thumb. They are commonly used to treat a variety of finger injuries, including fractures, dislocations, sprains, and strains. Finger splints are designed to provide stability and prevent movement in the affected finger(s), promoting healing and reducing pain.
Finger splints are valuable tools in the management of finger injuries, providing essential support and protection to facilitate the healing process. It's essential to consult with a healthcare provider for an accurate diagnosis and guidance on the appropriate type of finger splint and its correct application for a specific injury.
What is Splinting?
Splinting is a first aid technique that involves the application of a supportive device to immobilize and stabilize an injured limb or joint. It is primarily used in cases of bone fractures, dislocations, sprains, and strains. The primary goal of splinting is to prevent further movement or displacement of the injured area, which exacerbate the injury, damage surrounding tissues, or impede the healing process. Splinting helps reduce pain, prevent further injury, and keep the limb stable for safer transport.
Splints can be made from a variety of materials, such as wood, metal, plastic, or padded boards. They are designed to provide rigidity and support to the injured limb while maintaining proper alignment and minimizing pain. Splints can be customized to fit the shape of the injured area, ensuring a snug and secure fit.
Why Splinting is Important in First Aid?
Splinting is important in first aid because it immobilizes and stabilizes injured limbs or joints, preventing further damage and minimizing the risk of complications. It helps manage pain and discomfort by restricting movement and providing support. Splinting also plays a protective role, reducing the potential for additional injury during transportation or while awaiting professional medical assistance. By providing immediate stability and support, splinting improves the overall safety and well-being of the injured person, enhancing the chances of a smooth recovery and optimal outcomes.
Do not attempt to straighten a bent or angulated bone. Splint the injured limb in the position you find it unless you are specially trained to realign fractures.
What is the Difference Between Splinting and Casting
Splinting is the application of a supportive device, called a splint, to immobilize and stabilize an injured limb or joint. It provides initial support, is adjustable, and is often used as a temporary measure.
Casting, on the other hand, involves the use of a hard, rigid material, such as plaster or fiberglass, to encase the injured area completely. It provides long-term immobilization and is typically used for more serious fractures or injuries that require extended healing time. Casting is not adjustable and requires a healthcare professional to apply and remove it.
In summary, splinting is a temporary measure that offers initial support and adjustability, while casting provides long-term immobilization and requires professional application and removal.
What are the treatment options for torus fractures in children, and which is more effective?
Torus, or buckle, fractures are common in children, but their treatment varies. A review of the literature compared managing these fractures with a splint versus plaster of Paris. The review concluded that splinting is more cost-effective, allows a quicker return to normal function, and is preferred by parents. However, there is no conclusive evidence that splinting is less painful than using plaster of Paris.
What are the Benefits of Splinting
Splinting offers several benefits when it comes to first aid and injury management:
Immobilization and Stability: Splinting immobilizes and stabilizes the injured limb or joint, reducing movement and preventing further damage. This promotes healing by allowing the bones and tissues to remain in the correct alignment and position.
Pain Relief: By limiting movement and providing support, splinting helps alleviate pain and discomfort associated with fractures, dislocations, sprains, or strains. It reduces the risk of aggravating the injury and allows the injured person to experience greater comfort during transportation or while awaiting medical attention.
Minimizing Further Injury: Splinting acts as a protective measure, reducing the risk of additional trauma or complications. It creates a physical barrier around the injured area, preventing accidental bumps, jostling, or inappropriate manipulation that worsen the injury or lead to complications.
Preparing for Medical Treatment: Splinting provides temporary stabilization until professional medical help is obtained. By immobilizing the injury and minimizing further damage, splinting creates a safer environment for transportation and subsequent medical evaluation, ensuring that the injured person receives appropriate care in a timely manner.
Versatility and Accessibility: Splinting is a relatively simple and accessible technique that is performed in various emergency situations. Splints can be improvised using readily available materials like boards, sticks, or rolled-up newspapers, making it possible to provide immediate support even in resource-limited settings.
Indications for Splinting
Splinting is indicated in various situations, including:
Fractures: Splinting is commonly used to immobilize and stabilize bone fractures. It helps prevent further displacement or movement of the broken bone, reducing pain and minimizing the risk of additional injury.
Joint Dislocations: Splinting is often employed to stabilize and immobilize joints that have been dislocated. By keeping the joint in a fixed position, splinting helps relieve pain, reduce swelling, and prevent further damage to the surrounding structures.
Sprains and Strains: Splinting is beneficial for managing severe sprains or strains, particularly in cases where there is significant swelling, instability, or loss of function. It provides support to the injured ligaments or tendons, aiding in pain relief and promoting healing.
Soft Tissue Injuries: In certain cases of soft tissue injuries, such as severe contusions or lacerations, splinting is used to limit movement and minimize pain. It help protect the injured area from further trauma and facilitate the healing process.
Contraindications of Splinting
While splinting is generally beneficial, there are a few situations where it is contraindicated:
Open Fractures: Splinting should be avoided in cases of open fractures, where the broken bone has pierced through the skin. In such instances, the focus should be on controlling bleeding, covering the wound, and seeking immediate medical attention.
Unstable Fractures or Joint Dislocations: In instances where the fracture or dislocation is unstable and cannot be adequately immobilized with splinting alone, more advanced methods, such as casting or surgical intervention, is necessary.
Allergy or Intolerance: Some individuals have allergies or intolerances to the materials used in splints, such as latex or certain types of padding. In such cases, alternative methods of immobilization should be considered.
For Compartment syndrome, avoid tight splints or wraps. Compartment syndrome is not a contraindication to splinting, but splints should not restrict circulation. Always check for circulation, sensation, and movement (CSM) before and after applying the splint.
Emergency splinting techniques, such as using an anatomical splint where an injured limb is supported by another part of the body, are crucial in providing immediate care. These techniques stabilize the injury and minimize further damage until professional medical help is available. These techniques ensure immediate care and stabilization of fractures, sprains, and other musculoskeletal injuries. Here are general guidelines for the splinting techniques you mentioned:
Fracture Splinting
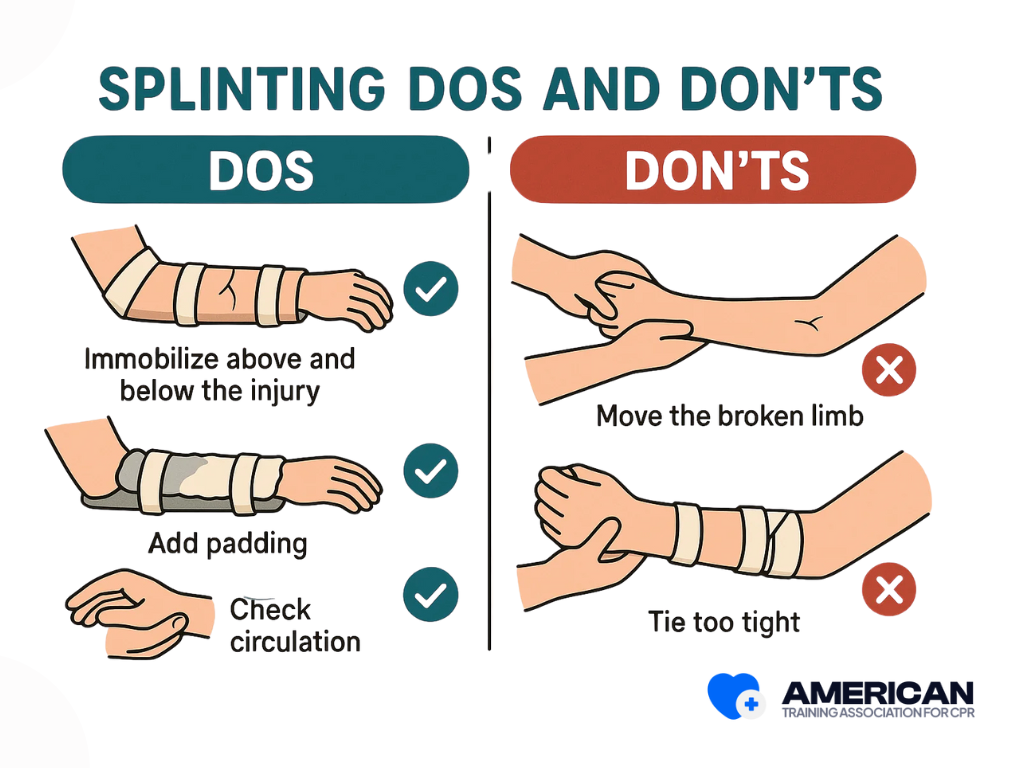
Support and stabilize the injured limb in its current position to minimize pain and prevent further movement. Manual stabilization is achieved by gently holding the limb in place or using a sling to support the weight of the injured arm.
Apply padding around the injured area to provide cushioning and protect bony prominences. Use materials such as cloth, gauze, or foam to create a protective layer.
Choose an appropriate splint, such as a rigid splint or a commercially available option, based on the fracture location and type. Place the splint on both sides of the injured limb, extending beyond the joint above and below the fracture site. Align the splint to maintain the limb in its anatomical position.
Use bandages, tape, or straps to firmly secure the splint in place. Start from the farthest point and work towards the body, ensuring the splint remains stable and the limb is well supported. Avoid excessive tightness that compromise circulation.
Joint or Ligament Sprain Splinting
Gently support and protect the injured joint or ligament by stabilizing it in a comfortable and neutral position. Avoid movements that causes further pain or damage.
Apply padding around the injured joint to provide cushioning and prevent pressure sores. Use materials such as cloth, gauze, or foam to create a protective layer.
Select an appropriate splint, such as a soft or anatomic splint, that provides support and immobilization for the specific joint or ligament sprain. Apply the splint around the injured joint, ensuring it covers the affected area adequately.
Use bandages, tape, or straps to secure the splint in place. It should be snug enough to provide support but not overly tight to restrict circulation or cause discomfort. Pay attention to maintaining proper alignment and stability.
Dislocation Splinting
If possible, gently manipulate the dislocated joint back into its proper position, following proper reduction techniques. This requires medical expertise, and it's essential to exercise caution to prevent further damage.
Once the dislocated joint is reduced, support and immobilize the joint in its corrected position to prevent further displacement and provide comfort. Use techniques similar to those for joint sprain splinting.
Finger or Thumb Splinting
Assess the nature and severity of the finger or thumb injury. Determine if there are any open wounds, deformities, or associated injuries that requirea medical attention.
Stabilize the injured finger or thumb in its current position to prevent further movement and minimize pain. Use your other hand or a soft cloth to provide support.
Apply padding around the injured area to provide cushioning and protect bony prominences. Use materials like cotton, gauze, or foam to create a comfortable layer between the injured digit and the splint.
Select an appropriate finger or thumb splint based on the location and extent of the injury. Apply the splint along the injured digit, ensuring it covers the affected area and immobilizes the joint above and below the injury.
Use tape or bandages to secure the splint in place. The splint should be snug enough to provide support and immobilization but not too tight to impede circulation or cause discomfort.
How can you provide effective pain management on splinting a broken bone?
To provide effective pain management during splinting of a broken bone, several approaches are taken. First, immobilization of the fracture site helps minimize pain by reducing movement and preventing further injury. Positioning the limb in a comfortable and natural position also alleviate pain.
Additionally, applying cold therapy, such as an ice pack wrapped in a cloth, to the surrounding area helps reduce swelling and numb the area, providing temporary pain relief. Offering over-the-counter pain medication, as appropriate and under medical guidance, further help manage pain during the splinting process.
What assessments should be performed before initiating splinting on a suspected dislocation?
Before initiating splinting on a suspected dislocation, several assessments should be performed. Start with a general assessment of the person's overall condition, checking for any life-threatening injuries. Next, focus on the injured joint or area suspected of dislocation, looking for visible deformities, swelling, and bruising. Evaluate the person's ability to move the joint and ask about pain, numbness, or tingling. Conduct a neurovascular assessment to ensure there are no signs of compromised circulation or sensation. Check for pulses, capillary refill, and the color of the skin. Finally, assess the range of motion of the joint, noting any limitations or abnormal movements.
These assessments help determine the extent of the injury and guide appropriate splinting techniques and interventions. It is crucial to seek professional medical attention for a proper diagnosis and treatment plan for a suspected dislocation.
How can you maintain patient comfort and minimize pain during splinting?
To maintain patient comfort and minimize pain during splinting, effective pain management strategies should be employed. These includes administering pain medication as prescribed or recommended by a healthcare professional. Utilize non-pharmacological pain relief techniques such as distraction, deep breathing exercises, or guided imagery to help divert the patient's attention from discomfort. Applying cold therapy, such as an ice pack wrapped in a cloth, to the surrounding area helps reduce pain and swelling.
Also, ensure the splint is properly padded and positioned to avoid unnecessary pressure or discomfort. Regularly assess the patient's pain level and address any concerns promptly. Communication and empathy play a vital role in providing support and reassurance throughout the procedure, ensuring the patient feels heard and their comfort is prioritized.
What Are The Recommended Splinting Supplies?
Aside from splints, there are other supplies you need when splinting an injury. These are found on your First Aid Kits:
Sterile or clean dressing materials
Soft padding materials like cotton rolls, cotton balls, or foam padding
Bandages and wraps
Scissors
Adhesive strips
Safety pins
Cleaning supplies (Antiseptic wipes or solutions)
Disposable gloves
Pen or marker for documenting important information on the splint, such as the date, time, and any specific instructions.
Utilizing improvised splints that are readily available is a useful skill in emergency situations or when proper medical supplies are not immediately accessible. Here are some tips for creating improvised splints:
Before applying any splint, stabilize the injured area by gently supporting it with your hands or using a soft cloth or towel.
Look for sturdy, straight objects like sticks, wooden boards, or even rolled-up magazines that serve as the main support for the splint. Ensure the object is long enough to extend beyond the injured area on both sides.
Use soft materials like clothing, towels, or cloth strips to pad the splint. Fold or wrap the padding around the object and place it next to the injured area.
Use fabric strips, belts, shoelaces, or any other strong and flexible material to secure the splint in place. Start above and below the injured area, wrapping the material firmly but not too tightly to allow for proper circulation.
Ensure the improvised splint provides adequate support and immobilization to the injured area. It should maintain the injured limb in a stable and natural position. Make any necessary adjustments to achieve proper alignment.
After applying the improvised splint, check the patient's circulation and sensation. Assess the color, temperature, and capillary refill of the fingers or toes beyond the splinted area. Ensure there are no signs of compromised blood flow or sensation.
Splinting in Different Age Groups
Splinting techniques vary based on the age group of the patient due to anatomical differences, growth considerations, and varying levels of cooperation. For children with minor wrist (buckle or torus) fractures, a removable splint or soft bandage is often preferred instead of a plaster cast. This approach allows faster recovery, greater comfort, and easier hygiene. Here's an overview of splinting in different age groups:
Infants and Toddlers (0-2 years)
Splinting in this age group is challenging due to limited cooperation and soft, pliable bones.
Soft splints or padded materials is used to provide gentle support and immobilization.
Splints should be lightweight, flexible, and properly secured to prevent accidental removal.
Preschoolers (3-5 years)
Preschoolers have slightly better cooperation and understanding.
Rigid or semi-rigid splints are used, but extra care should be taken to ensure comfort and proper padding.
Distraction techniques, such as storytelling or play, helps keep them engaged during the splinting process.
School-Age Children (6-12 years)
Children in this age group generally follow instructions and cooperate better.
Rigid splints or pre-formed splints is used for more precise immobilization.
Clear explanations of the procedure and reassurance helps alleviate anxiety.
Adolescents (13-18 years)
Adolescents have similar splinting considerations to adults, but growth plates and bone development should be taken into account.
Rigid or semi-rigid splints are used, depending on the nature of the injury.
Providing information about the splinting process and involving them in decision-making enhances compliance and cooperation.
Splinting Different Body Parts
Splinting techniques for different body parts vary depending on the specific injury and the need for immobilization. Here's an overview of splinting techniques for the lower and upper extremities:
Lower Extremities
Ankle/Foot:
Ankle Stirrup Splint involves wrapping the ankle with a figure-eight pattern using elastic bandages or immobilizing the ankle with a pre-formed splint.
A posterior Leg Splint involves securing a splint along the back of the leg from below the knee to the foot, providing support and immobilization.
Lower Leg:
A rigid Leg Splint is applied along the back of the lower leg, extending from below the knee to the foot, to immobilize fractures or stabilize lower leg injuries.
Air Splint is an inflatable splint that is used to stabilize and support the lower leg. It provides uniform compression and immobilization.
Upper Extremities
Wrist/Hand:
A volar splint is applied on the palm side of the hand and wrist to provide support and immobilization. It is made of rigid material or soft, moldable materials like SAM splints.
Thumb Spica Splint immobilizes the thumb and wrist by extending from the thumb to the forearm, offering stability and support.
Forearm/Elbow:
Ulnar Gutter Splint immobilizes the forearm and fingers, leaving the thumb free. It is used for fractures or injuries involving the ulnar side of the hand.
Posterior Elbow Splint is applied on the back of the arm and elbow, providing support and immobilization for elbow injuries.
Arm:
Sugar Tong Splint involves applying a splint along the inside and outside of the forearm, extending from the elbow to the wrist. This splint provides support and immobilization for forearm fractures or injuries.
Sling and Swathe: For certain arm injuries, a simple sling is used to support the arm and relieve strain, along with a swathe around the chest to secure the arm in place.
What are the potential challenges encountered during splinting in emergency situations?
During splinting in emergency situations, several potential challenges arises. Limited resources and time constraints are common hurdles, as there is a lack of appropriate splinting materials or limited time for proper assessment and splint application. Additionally, patient positioning and cooperation is challenging, as injured individuals are in pain, distressed, or uncooperative, making it difficult to position them correctly for splinting.
Anatomical considerations, such as accommodating variations in body types and injuries, also pose challenges. Unstable or hazardous environments, limited expertise, and training, as well as communication and language barriers further complicate the splinting process. Overcoming these challenges requires quick decision-making, adaptability, and improvisation while prioritizing patient safety and comfort.
What are the Possible Complications When Splinting?
While splinting, be aware of potential complications such as impaired circulation. Ensure the splint is secure but not too tight. Regularly monitor the injured area for signs of swelling or increased pain. Some possible complications when splinting a fracture include:
Compromised circulation: Improperly applied splints leads to compromised circulation, resulting in decreased blood flow to the affected area. This causes swelling, numbness, tingling, or even tissue damage. It is crucial to regularly assess circulation and adjust the splint if any signs of compromised circulation arise.
Pressure sores or skin irritation: Prolonged pressure or friction from the splint causes pressure sores or skin irritation. It is important to adequately pad the splint and regularly inspect the skin for any signs of redness, irritation, or breakdown. Adjustments to the padding or splint is necessary to relieve pressure and prevent skin complications.
Joint stiffness and muscle atrophy: Extended immobilization with a splint results in joint stiffness and muscle atrophy. It is important to periodically remove the splint and encourage gentle range of motion exercises to maintain joint flexibility and prevent muscle wasting. Physical therapy is needed during the recovery process.
Compartment syndrome: In rare cases, the application of a splint leads to compartment syndrome, a potentially serious condition characterized by increased pressure within a closed muscle compartment. This impairs blood flow and damage muscles and nerves. Watch for signs of severe pain, numbness, tingling, or swelling that does not resolve with elevation or pain medication. Immediate medical attention is required if compartment syndrome is suspected.
Allergic reactions: Some individuals experience allergic reactions to the materials used in splints, such as latex or adhesives. It is important to be aware of any known allergies and choose hypoallergenic materials whenever possible.
How should one care for a splinted limb to ensure proper healing and avoid complications?
Caring for a splinted limb is crucial for proper healing and to avoid complications. Here are general guidelines to follow:
Professional evaluation: It is important to schedule a follow-up appointment with a healthcare professional, such as a doctor or orthopedic specialist, to assess the progress of the injury and the effectiveness of the splint. They provide guidance on when to remove or adjust the splint and monitor the healing process.
X-rays or imaging: Depending on the nature of the injury, follow-up X-rays or other imaging tests are necessary to evaluate the alignment of the bones, the healing progress, and the need for any additional treatment or adjustments to the splint.
Splint maintenance: Proper maintenance of the splint is crucial during the healing process. Follow the healthcare professional's instructions regarding keeping the splint dry, clean, and intact. Avoid putting weight or stress on the injured area as directed.
Pain management: If the patient experiences pain or discomfort while wearing the splint, over-the-counter pain medication or prescribed pain management techniques are recommended. Follow the healthcare professional's guidance regarding pain relief during the recovery period.
Range of motion exercises: As advised by the healthcare professional, gentle range of motion exercises are initiated once the splint is removed to prevent joint stiffness and muscle atrophy. These exercises should be performed under professional guidance to avoid re-injury or complications.
Complication monitoring: Watch for any signs of complications, such as increased pain, swelling, changes in sensation, or signs of infection (redness, warmth, pus). If any of these symptoms occur, seek immediate medical attention.
Physical therapy: In some cases, physical therapy is prescribed to aid in the rehabilitation and recovery process. A physical therapist guide the patient through exercises and techniques to regain strength, mobility, and function.
What exercises or physical therapy are recommended after splint removal?
After the removal of a splint, specific exercises or physical therapy is recommended to aid in the recovery process and restore strength, mobility, and function. The exercises will depend on the type and location of the injury. Common recommendations include gentle range of motion exercises to gradually restore joint movement, stretching exercises to improve flexibility, and strengthening exercises to regain muscle strength. Physical therapists guide patients through tailored exercises and techniques to target the affected area and promote a safe recovery.
How Does First Aid Training Teach Effective Splinting?
First aid training teaches effective splinting by providing comprehensive instruction on recognizing different types of fractures and injuries that requires immobilization. Trainees learn to assess the injury site, choose appropriate materials, and apply splints correctly to stabilize the injured area and prevent further damage. The first aid training emphasizes key principles such as immobilizing the joints above and below the injury, ensuring the splint is snug but not too tight to avoid restricting blood flow, and maintaining the injured limb in a natural, comfortable position.
Why Is Splinting an Essential Part of First Aid Training?
Splinting is an essential part of basic first aid training because it plays a critical role in stabilizing fractures and preventing further injury or complications. Proper splinting alleviate pain, reduce swelling, and minimize the risk of additional damage to blood vessels, nerves, and surrounding tissues. In emergency scenarios, immediate and correct application of a splint prevents a simple fracture from becoming a more severe injury, thereby improving the patient's outcome. Moreover, effective splinting techniques empower first responders to manage injuries in a variety of settings, from everyday accidents to more severe incidents where professional medical help may be delayed. Understanding and applying splinting methods is vital for ensuring comprehensive and competent care, making it a cornerstone of first aid training.
References:
Richard R, Ward RS. Splinting strategies and controversies. J Burn Care Rehabil. 2005 Sep-Oct;26(5):392-6. doi: 10.1097/01.bcr.0000176886.63559.8b. PMID: 16151283.
Neal E. Comparison of splinting and casting in the management of torus fracture. Emerg Nurse. 2014 Feb;21(9):22-6. doi: 10.7748/en2014.02.21.9.22.e1260. PMID: 24494768.